exe 转换 python source
环境:
发现项目以前是跑在windows上的,管理工具都是python封装成的exe文件,遂决定解包exe,一探究竟。
一、摩拳擦掌
需要用到的工具:
1. pyinstaller官方解包
[GitHub pyinstaller/archive_viewer.py]
https://github.com/pyinstaller/pyinstaller/blob/develop/PyInstaller/utils/cliutils/archive_viewer.py
2. 三方解包工具
[GitHub countercept/python-exe-unpacker: pyinstxtractor.py]
https://github.com/countercept/python-exe-unpacker
3. 十六进制编辑器
[HXD]
http://jvniu.jb51.net:81/201705/tools/HxD_chs_jb51.rar
4. 机器环境
- python 3.6.5(windows 10)
- python 3.4.3(CentOs 7.x)
- 一个待解包的exe(monitor.exe)
5. pyc反编译工具 -- uncompyle6
|
1 |
pip install uncompyle |
6. pyc反编译工具
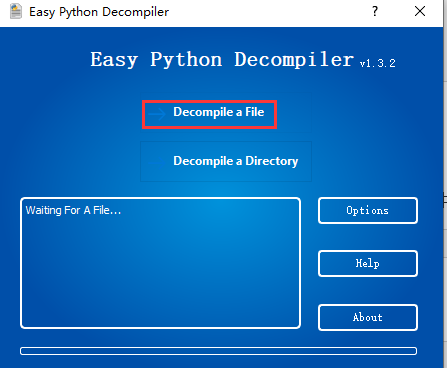
[Easy Python Decompiler v1.32]
https://nchc.dl.sourceforge.net/project/easypythondecompiler/bin/Easy%20Python%20Decompiler%20v1.3.2.7z
二、提枪上阵
1. 先使用第三方的工具试一波,你问我为什么?因为搜索引擎告诉我最多的就是使用pyinstxtractor + uncompyle
2. 下载pyinstxtractor.py到本地,基本需要的包python环境都有,不需要额外的包安装。
3. 整包解压,这里我的环境是win10 python 3.6.5
|
1 2 |
# 执行解压 python pyinstxtractor.py monitor.exe |
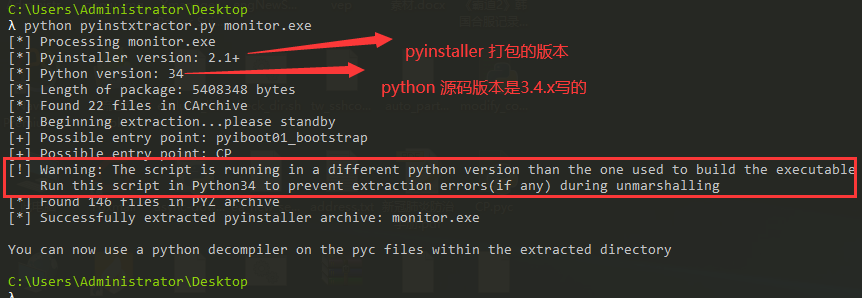
留意一下那行warning,意思就是说尽量使用同样版本的python去解包以避免不可预知的错误。(此处留坑,等下来填- -!)
4. 观察一下解包之后的目录结构:
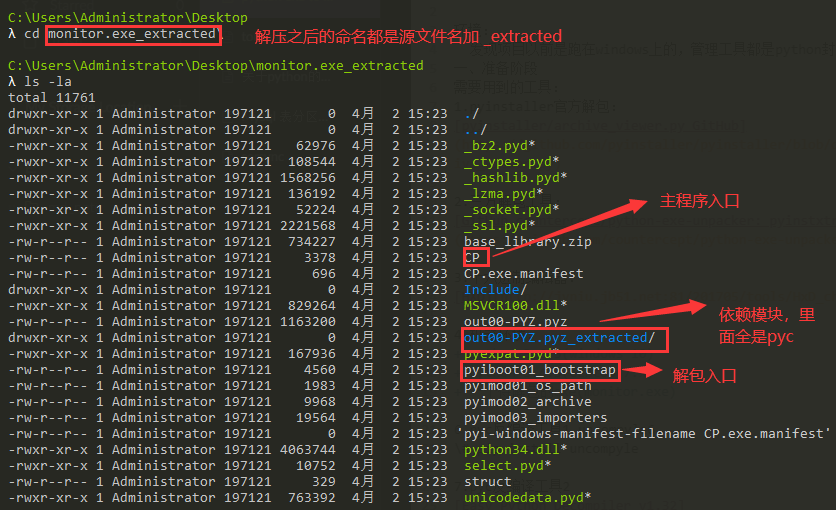
- 一眼看过去,好像都不是我们想要的pyc文件。
- 进入out00-PYZ.pyz_extracted一看,哇,开心,里面全是pyc,结果发现,没有一个是程序入口,全是打包时候打入的python模块的源码(使用uncompyle6.exe反编译了pyc就能看见源码。)
- 然后出来上一级目录,发现pyd文件,就想到了是不是在打包之前使用了Cython进行了编译,来防止反编译了呢?
- 后来根据第3点解包的时候,发现了两个可能的程序入口,分别是pyiboot01_boostrap(固定)和CP(主程序入口)
5. 死马当活马医
-> 直接使用uncompyle对程序入口文件进行反编译:
|
1 |
uncompyle6.exe CP |
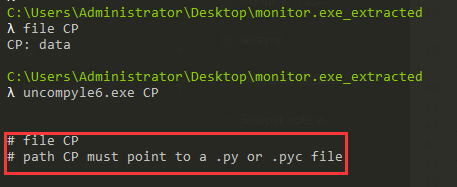
说不是pyc文件,不能反编译。
-> 在win10下,决尝试重命名文件重新反编译:
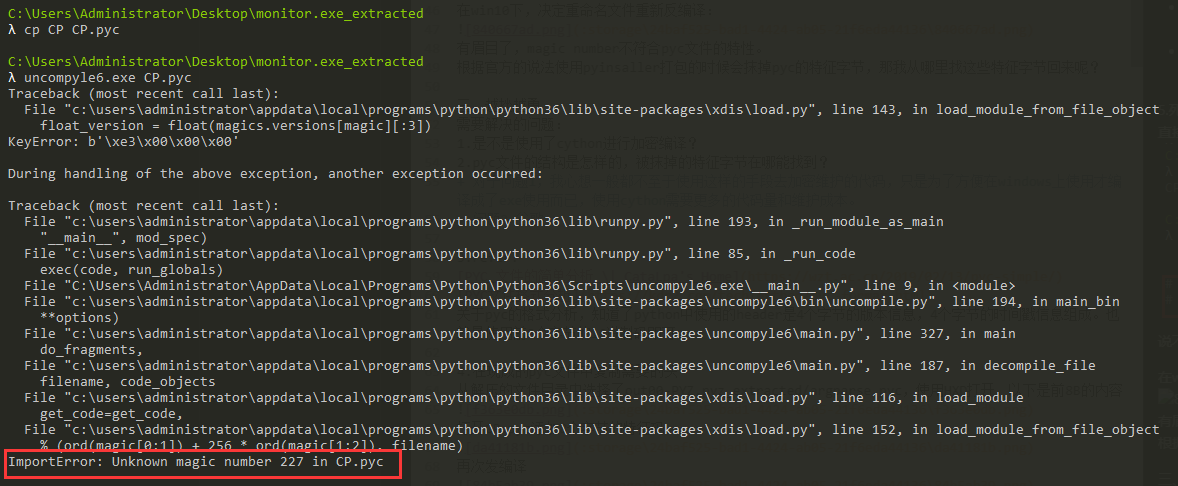
有眉目了,magic number不符合pyc文件的特性。
-> 根据官方的说法使用Pyinsaller打包的时候会抹掉pyc的特征字节,那我从哪里找这些特征字节回来呢?
三、越挫越勇
需要解决的问题
1. 是不是使用了cython进行加密编译?
2. pyc文件的结构是怎样的,被抹掉的特征字节在哪能找到?
- 问题1,我心想一般都不至于使用这样的手段去加密维护的代码,只是为了方便在windows上使用才编译成了exe使用而已,使用Cython需要更多的代码量和维护成本。
- 问题2, 谷歌
3. 关于pyc的文件格式分析,我参考了以下两位大佬的文章
[PYC 文件的简单分析 \| CataLpa's Home]
https://wzt.ac.cn/2019/02/13/pyc-simple
[PYC文件格式分析]
https://kdr2.com/tech/python/pyc-format.html
-> 结论:pyc中使用的header是4个字节的版本信息,4个字节的时间戳信息组成。也就是使用前8个字节的16进制码即可。
4. 在现成的pyc文件中复制需要的头
-> 从解压的文件目录中选择了out00-PYZ.pyz_extracted/argparse.pyc,使用HXD打开,以下是前8B的内容
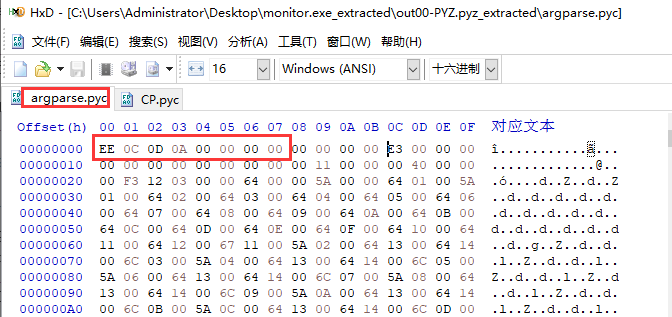
-> 打开CP.pyc添加8个字节的header
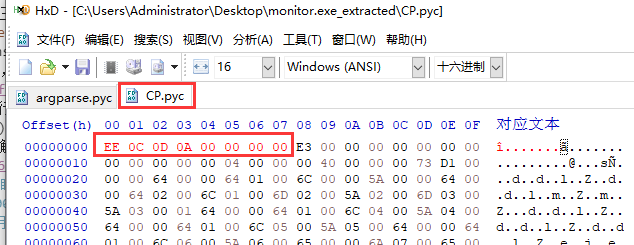
-> 保存之后再次反编译
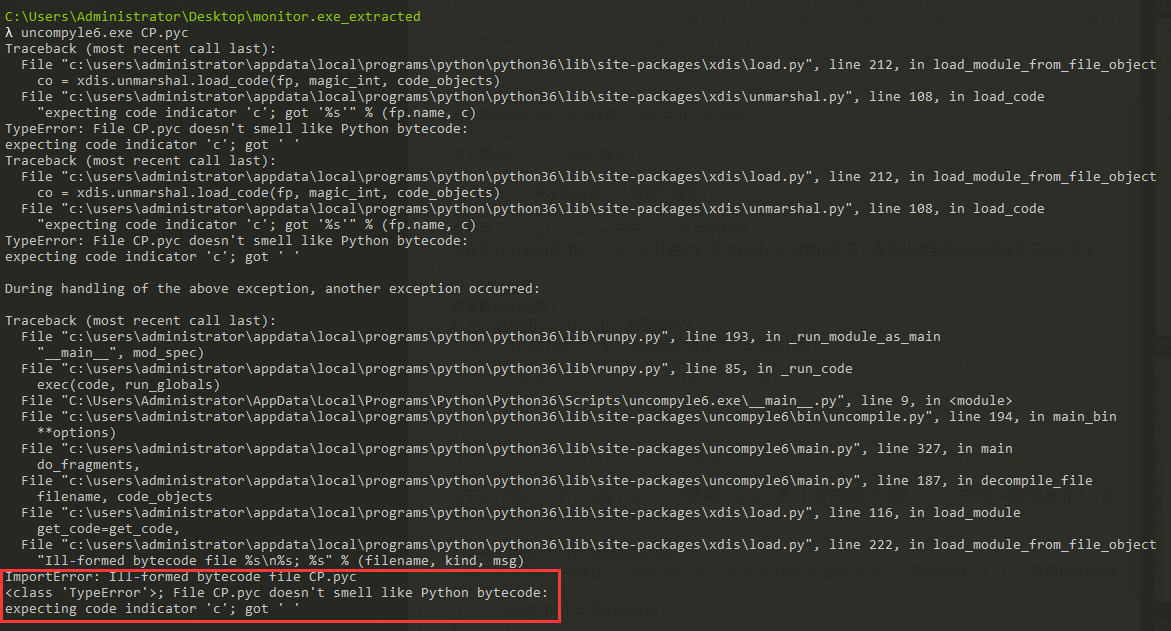
还是不行,根据谷歌的结果,这是因为pyc的版本不一致(注意这里的版本)导致的,比如说是在2.7的环境下运行生成的pyc,那么现在在3.6的环境下运行反编译可能就会出现问题。
-> 好了,现在回到提枪上阵的那个坑,在想是不是因为现在用了3.6.5的版本去解包3.4.x的程序会有问题呢?
5. 在CentOs7上pyenv部署了python 3.4.3环境
-> 重新解包,没有出现warning了
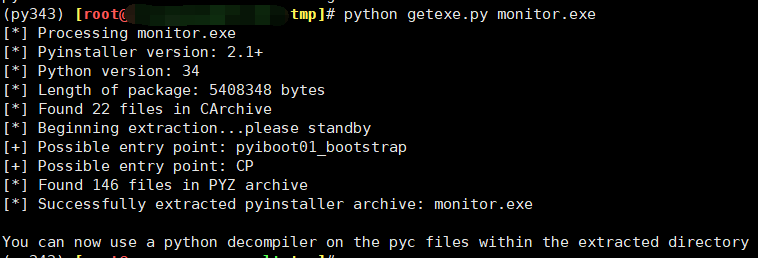
-> 这里getexe.py 是pyinstxtractor.py的别名而已,不用在意(狗🐶头)
-> 之后我重复了以上的所有操作,添加CP.pyc的header,然后重新反编译,但是我得到一样的提示,版本不一致!!
-> 心想,3.4.x的版本之间不应该差异这么大(实际上我使用pyenv另外又部署了3.4.0的版本去解包测试,得到的结果一样!!)吧,遂决定重新搜索相关的报错。
四、破釜沉舟
-> 在经历长时间的搜索之后,发现了这个文章。
[python3.7反编译生成的.exe_Python_liubingzhe-CSDN博客]
https://blog.csdn.net/qq_44198436/article/details/97314626
这个哥们使用的是对比法,对16进制的位数进行了对比,最终决定添加12(8+4)字节的header,我根据他的操作,同样添加了12字节之后,可以成功反编译。
1. HXD编辑argparse.pyc
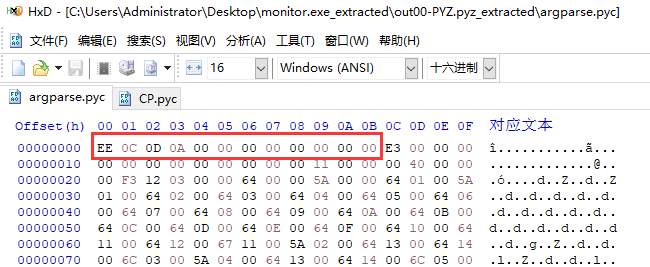
2. HXD添加前12字节到CP.pyc

3. 使用 uncomoyle 成功反编译CP.pyc

-> 为什么是12位,不是8位,明明4个字节的版本信息,4个字节的时间戳,现在却无端多出了4个字节,不符合逻辑。后来回想起来,网上找资料的时候都停留在2.x,3.2的python版本,多出来的四字节不可能是数据,只能是特征标记,就想着是不是pyc的结构改变了呢?遂决定从官网入手了。
五、醍醐灌顶
1. 在python3.2版本PEP 3147中,还有提到过32-bit numbers represent a magic number and a timestamp,也就是说直至python 3.2都是这个8字节的格式的
[PEP 3147 -- PYC Repository Directories \| Python.org]
https://www.python.org/dev/peps/pep-3147/

2. 在python3.7版本PEP 552中
[PEP 552 -- Deterministic pycs \| Python.org]
https://www.python.org/dev/peps/pep-0552/

这里提及到,pyc的header将会从3(12B)个将会变成4(16B)了。
-> 究其原因,就是因为版本之间的不同,导致了pyc的header改变了,这也解析了为什么在反编译的时候会出现版本不对的报错了。
-> 至此,所有的问题基本解决,可以直接使用工具解包exe还原成python源码。
3. 根据这位老哥提供的脚本可以说明,第3个32-bit存放的是这个文件的大小(已验证)
[Reading pyc file (Python 3.5.2) - Qiita]
https://qiita.com/amedama/items/698a7c4dbdd34b03b427
|
1 2 3 4 5 6 7 8 9 10 11 12 13 14 15 16 17 18 19 20 21 22 23 24 25 26 27 28 29 30 31 32 33 34 35 36 37 38 39 40 41 42 43 44 45 46 47 48 49 50 51 52 53 54 55 56 57 58 59 60 61 62 63 64 65 |
import binascii import dis import marshal import sys import time import types def get_long(s): return s[0] + (s[1] << 8) + (s[2] << 16) + (s[3] << 24) def show_hex(label, h, indent): h = binascii.hexlify(h).decode('ascii') if len(h) < 60: print('%s%s %s' % (indent, label, h)) else: print('%s%s' % (indent, label)) for i in range(0, len(h), 60): print('%s %s' % (indent, h[i:i+60])) def show_code(code, indent=''): print('%scode' % indent) indent += ' ' print('%sargcount %d' % (indent, code.co_argcount)) print('%snlocals %d' % (indent, code.co_nlocals)) print('%sstacksize %d' % (indent, code.co_stacksize)) print('%sflags %04x' % (indent, code.co_flags)) show_hex('code', code.co_code, indent=indent) dis.disassemble(code) print('%sconsts' % indent) for const in code.co_consts: if isinstance(const, types.CodeType): show_code(const, indent+' ') else: print(' %s%r' % (indent, const)) print('%snames %r' % (indent, code.co_names)) print('%svarnames %r' % (indent, code.co_varnames)) print('%sfreevars %r' % (indent, code.co_freevars)) print('%scellvars %r' % (indent, code.co_cellvars)) print('%sfilename %r' % (indent, code.co_filename)) print('%sname %r' % (indent, code.co_name)) print('%sfirstlineno %d' % (indent, code.co_firstlineno)) show_hex('lnotab', code.co_lnotab, indent=indent) def show_file(fname: str) -> None: with open(fname, 'rb') as f: magic_str = f.read(4) mtime_str = f.read(4) mtime = get_long(mtime_str) modtime = time.asctime(time.localtime(mtime)) print('magic %s' % binascii.hexlify(magic_str)) print('moddate %s (%s)' % (binascii.hexlify(mtime_str), modtime)) if sys.version_info < (3, 3): print('source_size: (unknown)') else: source_size = get_long(f.read(4)) print('source_size: %s' % source_size) show_code(marshal.loads(f.read())) if __name__ == '__main__': show_file(sys.argv[1]) |
六、上善若水
1.Easy Python Decompiler使用很简单,直接打开之后选择需要反编译的pyc文件即可,会生成一个pyc_dis后缀的文件,里面打开就是源码了:
2. 关于源码中中文乱码的问题,因为windows下使用的是GBK编码,所以极大多数情况下出来的中文都是乱码,使用一下命令转码即可看见中文:
|
1 |
iconv -f GBK -t utf8 yourpyfile.py |
3. 关于archive_viewer.py的使用:
-> 这个需要事先安装PyInstaller
|
1 |
pip install PyInstaller -i https://pypi.tuna.tsinghua.edu.cn/simple |
-> 直接可以解包:
|
1 |
python archive_viewer.py monitor.exe |
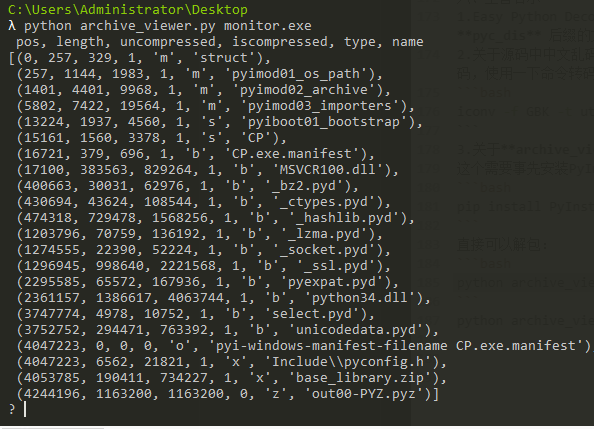
-> 这里保存主程序入口CP和struct,struct是pyinstaller打包之后所有的header信息都会存放在这里。当然前面看到用其他的pyc文件的header也能成功反编译,但是还是建议使用struct的header比较保险。

-> 之后的步骤就是重复上边的,使用HXD修改pyc文件的header了,修改之后就是使用uncompyle6.exe进行反编译,效果是一样的。
以上 。
自2016年3月建站,至今已是4年有余,从香港到西雅图,虽然此站不常更新,但是它一直都在。这一切都是@Hui 辉总的坚持,今天我特来除除草,希望此站长存!!

Very yes!